Measurement
What is measurable?
You can measure any type of 3D data and 2D plans that are visualized.
Measurements are organized and stored in layers.
What measurement tools are available?
| Line Measurement | Area Measurement | Volume Measurement |
|---|---|---|
| Distance | Area | Volume |
| Polyline | Area Strip | |
| Vertical | ||
| Line | ||
| Axis Aligned |
Distance Measurement

A Distance Measurement is a measurement of the shortest path between a specified start- and endpoint.
How to create a Distance Measurement?
- Choose the "Distance" measurement tool
- Left-click to designate a start/end point on the model or plan data
- Choose the desired layer from the list to store the measurement
- You can proceed with additional measurements or save the current one by clicking on "Finish"
For further information on working with measurement layers, click here…


How to store/save a measurement?
Once the measurement is completed, a number indicating the count of unsaved measurements appears next to the measurement symbol in the top-left corner
- Open the measurement
- Click on the red dialog box
- A popup will appear; select "Save changes" to save the measurements


How to modify a Distance Measurement?
If a measurement hasn't been stored yet:
While the measurement remains unsaved, adjustments can be made to both measurement points. Additionally, you can select and edit other measurements during this stage.
- To relocate a measurement point, simply hold down the Left-Mouse-Button and move the point to the desired location
For a stored measurement:
- Click on the measurement you wish to modify
- Activate the eye icon on the right
- Access the Edit-Measurement tool
- Make the necessary modifications
- Store the changes


How to delete a measurement?
- Click on the measurement you wish to delete
- If not yet activated, click on the eye icon to make the measurement visible (To activate all measurements, click on the eye of the folder, if you only want to activate a specific measurement, click on its corresponding eye icon)
- Click on the tape measurement to open the drop-down menu
- Click on "Edit"
- Within the point cloud, select the measurement you wish to remove
- The measurement will turn red, indicating it's ready for deletion
- Press the "Delete" key on your keyboard or click on the trash bin icon
or
- Select the desired measurement in the navigation pane
- Right-click to open the context menu
- Click on the "Delete" button


How to move a measurement from one layer to another?
Option 1:
- Select the measurement you wish to move within the navigation pane
- Drag and Drop it into the desired layer
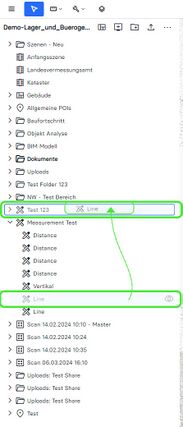

or
Option 2:
- Click on the measurement you wish to move
- If not yet activated, click on the eye icon to make the measurement visible (To activate all measurements, click on the eye of the folder, if you only want to activate a specific measurement, click on its corresponding eye icon)
- Click on the tape measurement to open the drop-down menu
- Click on "Edit"
- Within the point cloud, select the measurement you wish to move to another layer
- The measurement will turn red, indicating it's ready for deletion
- The Edit window appears
- Click on the dropdown menu of "Measurement Layer"
- Choose one of the existing ones, or create a new layer
- Click on "Finish" to save the changes


Polyline Measurement
A Polyline measurement is a measurement of the shortest path along a selection of specified points.
It shows the distance between two or more points. (XYZ axis)

How to create a Polyline measurement?
- Choose the "Polyline" measurement tool
- Select the wanted points in the model or the plan data
- Select the desired layer from the list in which the measurement is to be save
- Click on the "Finish" button
- Now you can start the next measurement or store the measurement
For further information on working with measurement layers, click here.
How to store/save a measurement?
Once a measurement is completed, a numerical indicator (representing the number of unsaved measurements) appears next to the measurement symbol in the top left corner.
- Open the measurement
- Click on the red dialog box
- A popup will appear; choose "Save changes" to store the measurements.
How to change a Polyline measurement?
If the measurement has not been saved:
While the measurement remains unsaved, adjustments can be made at any points. You can also select and edit other measurements during this stage.
To manipulate a Polyline measurement:
- To add a point, left-click on the red line
- To remove a point, left-click on the blue point you wish to remove
- To relocate a point, hold down the Left-Mouse-Button and move the point to the desired position
If the measurement has been saved:
- Access the "Edit" measurement tool
- Click on the desired measurement to be modified
- Modify and save
How to delete a Distance measurement?
- Access the "Edit" measurement tool
- Click on the measurement you wish to delete
- The measurement turns red, indicating it's ready for deletion
- Press the "Delete" key on your keyboard or click on the trash bin icon
or
- Select the desired measurement in the navigation pane
- Right-click to access the context menu
- Click the "Delete" button
How to move a measurement from one layer to another?
Option 1:
- Select the measurement you wish to move within the navigation pane
- Drag and Drop it into the desired layer
or
Option 2:
- Enter Edit mode
- Select the measurement you wish to move to another layer
- Select the desired layer
- "Finish" and "Save" the measurement
Vertical Measurement
A Vertical measurement is a measurement of the height difference between two specified points.

How to create a Vertical measurement?
- Select the "Vertical" measurement tool
- Left-click to choose a point at the top and another point on the floor within the model
- Select the layer for storing the measurement from the provided list
- Proceed with additional measurements or store the current one
For further information on working with measurement layers, click here.
How to store/save a measurement?
Once the measurement is completed, a numerical indicator (representing the number of unsaved measurements) appears next to the measurement symbol at the top left corner.
- Open the measurement
- Click on the red dialog box
- A popup will appear; choose "Save changes" to save the measurements
How to change a Vertical measurement?
If the measurement has not been saved:
While the measurement remains unsaved, adjustments can be made at both points. Additionally, other measurements can be selected and edited during this stage.
- To relocate a measurement point, simply hold down the Left-Mouse-Button and move it to the desired location
- However, note that the middle point of a Vertical Measurement is not movable.
If the measurement has been saved:
- Access the "Edit" measurement tool
- Click on the measurement you wish to modify
- Make the necessary modifications
- Save the changes
How to delete a measurement?
- Access the "Edit" measurement tool
- Select the measurement you wish to delete
- The measurement turns red, indicating it's ready for deletion
- Press the "Delete" key on your keyboard or click on the trash bin icon
or
- Select the desired measurement in the navigation pane
- Right-click to access the context menu
- Click the "Delete" button
How to move a measurement from one layer to another?
Option 1:
- Select the measurement you wish to move within the navigation pane
- Drag and Drop it into the desired layer
or
Option 2:
- Enter Edit mode
- Select the measurement you wish to move to another layer
- Select the desired layer
- "Finish" and "Save" the measurement
Axis Aligned Measurement
The Axis Aligned measurement shows the distance on all axes between two points. (XYZ axis)

How to create an Axis Aligned measurement?
- Choose the "Axis Aligned" measurement tool
- Left-click to designate a point at the top and another anywhere on the floor within the model
- Choose the desired layer from the provided list to save the measurement
- Proceed with additional measurements or save the current one
For further information on working with measurement layers, click here.
How to store/save a measurement?
Once the measurement is completed, a numerical indicator (representing the number of unsaved measurements) appears next to the measurement symbol at the top left corner.
- Open the measurement
- Click on the red dialog box
- A popup will appear; choose "Save changes" to save the measurements
How to change an Axis Aligned measurement?
If the measurement has not been saved:
While the measurement remains unsaved, adjustments can be made at both points. Additionally, other measurements can be selected and edited during this stage.
- To relocate a measurement point, simply hold down the Left-Mouse-Button and move it to the desired location
- However, note that the middle point of a Vertical Measurement is not movable.
If the measurement has been saved:
- Access the "Edit" measurement tool
- Click on the measurement you wish to modify
- Make the necessary modifications
- Save the changes
How to delete a measurement?
- Access the "Edit" measurement tool
- Select the measurement you wish to delete
- The measurement turns red, indicating it's ready for deletion
- Press the "Delete" key on your keyboard or click on the trash bin icon
or
- Select the desired measurement in the navigation pane
- Right-click to access the context menu
- Click the "Delete" button
How to move a measurement from one layer to another?
Option 1:
- Select the measurement you wish to move within the navigation pane
- Drag and Drop it into the desired layer
or
Option 2:
- Enter Edit mode
- Select the measurement you wish to move to another layer
- Select the desired layer
- "Finish" and "Save" the measurement
Line Measurement
A Line measurement is a measurement on a user-defined plane that calculates the distance between points of interest.

How to create a Line measurement?
- Select the "Line" measurement tool
- Choose a start/end point in the model or plan data
- Click on the red line between the start/end points to add additional measurement points
- Select the desired layer from the list to store the measurement
- Click on the "Finish" button
- You can now proceed with another measurement or save the current one
For further information on working with measurement layers, click here.
How to store/save a measurement?
After the measurement has been finished, a number (Number of currently not stored measurements) appears next to the measurement symbol at the top left corner.
- Open the measurement
- Click on the red dialog box
- A popup will appear; choose "Save changes" to save the measurements
How to change a Line measurement?
If the measurement has not been saved:
While the measurement remains unsaved, adjustments can be made at all points. Additionally, other measurements can be selected and edited during this stage.
To manipulate the Line measurement:
- To add a point, left-click on the red line.
- To remove a point, left-click on the blue point you wish to remove.
- To relocate a point, hold down the Left-Mouse-Button and move it to the desired location on the red line.
If the measurement has been saved:
- Access the "Edit" measurement tool
- Click on the measurement you wish to modify
- Make the necessary modifications
- Save the changes
How to delete a Line measurement?
- Access the "Edit" measurement tool
- Select the measurement you wish to delete
- The measurement turns red, indicating it's ready for deletion
- Press the "Delete" key on your keyboard or click on the trash bin icon
or
- Select the desired measurement in the navigation pane
- Right-click to access the context menu
- Click the "Delete" button
How to move a measurement from one layer to another?
Option 1:
- Select the measurement you wish to move within the navigation pane
- Drag and Drop it into the desired layer
or
Option 2:
- Enter Edit mode
- Select the measurement you wish to move to another layer
- Select the desired layer
- "Finish" and "Save" the measurement
Area Measurement
The Area measurement is intended for area measurements on smooth planes. For example the floor or wall surfaces in buildings.

How to create an Area measurement?
- Select the "Area" measurement tool
- Draw a plane by marking at least 3 points in the model or plan data
- Choose the desired layer from the list to save the measurement
- Click on the "Finish" button
- Proceed with another measurement or save the current one
For further information on working with measurement layers, click here.
How to store/save a measurement?
Once the measurement is completed, a numerical indicator (representing the number of unsaved measurements) appears next to the measurement symbol at the top left corner.
- Open the measurement
- Click on the red dialog box
- A popup will appear; choose "Save changes" to save the measurements
How to change an Area measurement?
If the measurement has not been saved: While the measurement remains unsaved, adjustments can be made at all points. Additionally, other measurements can be selected and edited during this stage.
To manipulate the Line measurement:
- To add a point, left-click on the red line.
- To remove a point, left-click on the blue point you wish to remove.
- To relocate a point, hold down the Left-Mouse-Button and move it to the desired location on the red line.
If the measurement has been saved:
- Access the "Edit" measurement tool
- Click on the measurement you wish to modify
- Make the necessary modifications
- Save the changes
How to delete an Area measurement?
- Access the "Edit" measurement tool
- Select the measurement you wish to delete
- The measurement turns red, indicating it's ready for deletion
- Press the "Delete" key on your keyboard or click on the trash bin icon
or
- Select the desired measurement in the navigation pane
- Right-click to access the context menu
- Click the "Delete" button
How to move a measurement from one layer to another?
Option 1:
- Select the measurement you wish to move within the navigation pane
- Drag and Drop it into the desired layer
or
Option 2:
- Enter Edit mode
- Select the measurement you wish to move to another layer
- Select the desired layer
- "Finish" and "Save" the measurement
Area Strip Measurement
An Area Strip measurement allows you to measure the area of a triangulated surface.
.
How to create an Area Strip measurement?
- Select the Area Strip measurement tool
- Draw a triangle by marking 3 points in the model
- For additional triangles, select a 4th point. Each subsequent triangle shares a point with the previous one (e.g., point 2, 3, and 4 for the second triangle)
- Select the desired layer from the list to store the measurement
- Click on the "Finish" button
- Proceed with another measurement or store the current one
For further information on working with measurement layers, click here.
How to store/save a measurement?
Once the measurement is completed, a numerical indicator (representing the number of unsaved measurements) appears next to the measurement symbol at the top left corner.
- Open the measurement
- Click on the red dialog box
- A popup will appear; choose "Save changes" to save the measurements
How to change an Area Strip measure point?
If the measurement has not been saved:
While the measurement remains unsaved, adjustments can be made at all points. Additionally, other measurements can be selected and edited during this stage.
To manipulate the Area Strip measurement:
- To add a point, left-click on the red line.
- To remove a point, left-click on the blue point you wish to remove.
- To relocate a point, hold down the Left-Mouse-Button and move it to the desired location on the red line.
Adding another triangle to an Area Strip Measurement is not possible at the moment!
If the measurement has been saved:
- Access the "Edit" measurement tool
- Click on the measurement you wish to modify
- Make the necessary modifications
- Save the changes
How to delete an Area Strip measurement?
- Access the "Edit" measurement tool
- Select the measurement you wish to delete
- The measurement turns red, indicating it's ready for deletion
- Press the "Delete" key on your keyboard or click on the trash bin icon
or
- Select the desired measurement in the navigation pane
- Right-click to access the context menu
- Click the "Delete" button
How to move a measurement from one layer to another?
Option 1:
- Select the measurement you wish to move within the navigation pane
- Drag and Drop it into the desired layer
or
Option 2:
- Enter Edit mode
- Select the measurement you wish to move to another layer
- Select the desired layer
- "Finish" and "Save" the measurement
Volume Measurement
A Volume measurement refers to the process of determining the amount of space occupied by a three-dimensional object.

What types of Volume calculation options are available?
Volume calculation based on:
- Best Fit Surface (default calculation type): Creates an optimized triangulated surface from the drawn points.
- Height: Calculates the volume above the defined height.
- Point Clouds Difference: Calculates the volume between two sets of point clouds.
How to create a Volume measurement based on "Best Fit Surface"?
- Select the "Volume" measurement tool
- Indicate the area to be measured by selecting at least 3 points on the point cloud
- Calculate the volume by clicking the "Calculate Volume" button (wait for the message "Calculating Volume succeeded").
- Press the "Finish" button
or
- Navigate to the "Storage Location" option in the volume menu
- Choose the desired layer from the list to store the measurement
- Click on the "Finish" button
- Proceed with another measurement or store the current one
For further information on working with measurement layers, click here.
How to create a Volume measurement based on "Height"?
- Choose the "Volume" measurement tool
- Select at least 3 points on the point cloud to indicate the area to be measured
- Navigate to "Calculation Type" in the volume menu
- Open the drop down menu and choose Based on "Height"
- You can manually enter the height
or
- Left-click on the desired point within the point cloud
- The height of the selected point is automatically adopted
- Calculate the volume by clicking the "Calculate Volume" button
- The result is saved in the last layer used when saving the measurement
or
- Navigate to the "Storage Location" option in the volume menu
- Choose the desired layer from the list to store the measurement
- Click on the "Finish" button
- Proceed with another measurement or store the current one
For further information on working with measurement layers, click here.
How to create a Volume measurement based on "Point Clouds Difference"?
- Activate at least 2 point clouds within the navigation pane
- Choose the "Volume" measurement tool
- Select at least 3 points on the point cloud to indicate the area to be measured
- Navigate to "Calculation Type" in the volume menu
- Open the drop down menu and choose "Point Clouds Difference"
- In the list, which shows all active point clouds, assign point clouds to the two groups by clicking on the group number (group 1 is the Surface Point Cloud and group 2 the Base Point Cloud)
- Click on the "Calculate Volume" button
- Click on the "Finish" button
- Proceed with another measurement or store the current one
For further information on working with measurement layers, click here.
How to store/save a measurement?
Once the measurement is completed, a numerical indicator (representing the number of unsaved measurements) appears next to the measurement symbol at the top left corner.
- Open the measurement
- Click on the red dialog box
- A popup will appear; choose "Save changes" to save the measurements
How to change a Volume measurement?
If the measurement has not been saved: While the measurement remains unsaved, adjustments can be made at all points. Additionally, other measurements can be selected and edited during this stage.
To manipulate the Area Strip measurement:
- Check whether you are in the correct step of the volume calculation
- Calculation Area
- Calculation Type
- Storage Location
- To add a point, left-click on the red line.
- To remove a point, left-click on the blue point you wish to remove.
- To relocate a point, hold down the Left-Mouse-Button and move it to the desired location on the red line.
If the measurement has been saved:
- Access the "Edit" measurement tool
- Click on the measurement you wish to modify
- Check whether you are in the correct step of the volume calculation
- Calculation Area
- Calculation Type
- Storage Location
- Make the necessary modifications
- Save the changes
How to delete a Volume measurement?
- Access the "Edit" measurement tool
- Select the measurement you wish to delete
- The measurement turns red, indicating it's ready for deletion
- Press the "Delete" key on your keyboard or click on the trash bin icon
or
- Select the desired measurement in the navigation pane
- Right-click to access the context menu
- Click the "Delete" button
How to move a measurement from one layer to another?
Option 1:
- Select the measurement you wish to move within the navigation pane
- Drag and Drop it into the desired layer
or
Option 2:
- Enter Edit mode
- Select the measurement you wish to move to another layer
- Select the desired layer
- "Finish" and "Save" the measurement